Let’s be honest: no celebration feels complete without that one sweet, frosted centerpiece — the birthday cake. While store-bought versions might save time, there’s something genuinely memorable about baking one from scratch. Whether you’re surprising your child, partner, or just honoring your own lap around the sun, the process itself becomes part of the celebration.
This guide is crafted for home bakers looking to turn a simple recipe into a full-blown ritual. We’ll walk through how to bake a classic, fluffy cake that looks stunning and tastes even better. From variations to decorating tips — and ways to fix those all-too-common mishaps — you’ll find everything you need to create a birthday cake worth remembering.
Table of Contents
Table of Contents
Why You’ll Love This Birthday Cake

There’s more to this recipe than flour and frosting. It’s about the moment someone’s eyes light up when they see their favorite flavor made just for them. The smell of vanilla (or chocolate!) wafting through your kitchen. The pride in slicing into a cake you made with love. This isn’t just another birthday cake — it’s the one they’ll ask for again next year.
This guide is crafted for home bakers looking to turn a simple recipe into a full-blown ritual. We’ll walk through how to bake a classic, fluffy cake that looks stunning and tastes even better. From variations to decorating tips — and ways to fix those all-too-common mishaps — you’ll find everything you need to create a birthday cake worth remembering.
Ingredients & Tools Needed for the Perfect Birthday Cake
Before you preheat the oven or grease a single pan, let’s make sure you’ve got everything ready. A smooth baking session starts with being fully prepped — and yes, that includes double-checking you actually have enough sugar.
Ingredients for a Classic Birthday Cake
Here’s what you’ll need to bake a moist, fluffy, crowd-pleasing birthday cake from scratch. These ingredients serve a two-layer 9-inch round cake.
- 2½ cups (300g) all-purpose flour
- 2½ tsp baking powder
- ½ tsp baking soda
- ½ tsp salt
- ¾ cup (170g) unsalted butter, softened
- 1¾ cups (350g) granulated sugar
- 4 large eggs, room temperature
- 1 tbsp pure vanilla extract
- 1 cup (240ml) buttermilk
- Optional: ½ cup rainbow sprinkles (for a funfetti twist)
Essential Tools for Success
Don’t worry — no industrial kitchen required. These tools are common in most home kitchens:
- Two 9-inch round cake pans
- Electric mixer (stand or hand)
- Mixing bowls (at least two)
- Rubber spatula
- Whisk
- Measuring cups & spoons
- Wire cooling rack
- Offset spatula (for icing, optional but helpful)
What if I don’t have buttermilk?
You can easily make a substitute: Mix 1 cup of milk with 1 tablespoon of lemon juice or white vinegar. Let it sit for 5–10 minutes, then use it just like buttermilk. It keeps your birthday cake tender and flavorful.
Step-by-Step Baking Instructions for the Perfect Birthday Cake
This is where the magic happens — turning simple ingredients into a memory-making birthday cake. If you’ve ever felt overwhelmed by baking instructions, don’t worry. These steps are clear, doable, and backed by years of cake mishaps turned into wins.
Step 1: Prep Like a Pro
- Preheat your oven to 350°F (175°C).
- Grease and flour your cake pans or line them with parchment rounds. This is your anti-stick insurance.
- Measure out all your ingredients ahead of time. Trust us — mid-recipe flour hunts kill the vibe.
Step 2: Cream Butter & Sugar
- In a large bowl, beat the butter and sugar together on medium speed for 3–4 minutes until light and fluffy.
- This step traps air in the batter, which helps create that light, cloud-like texture we love in a birthday cake.
Step 3: Add Eggs and Vanilla
- Beat in the eggs one at a time, scraping down the bowl between each addition.
- Add vanilla extract. Smell that? That’s nostalgia kicking in.
Step 4: Mix the Dry Ingredients
- In a separate bowl, whisk together flour, baking powder, baking soda, and salt.
- Add this mix to the wet ingredients in three parts, alternating with the buttermilk (start and end with dry).
- Stir gently — just until combined. Overmixing = dense cake sadness.
Step 5: Bake with Patience
- Divide batter evenly between the prepared pans and smooth the tops.
- Bake for 28–32 minutes, or until a toothpick inserted in the center comes out clean.
- Cool in pans for 10 minutes, then turn onto a wire rack to cool completely.
Can I make the layers ahead of time?
Absolutely. You can bake your birthday cake layers a day in advance. Once cooled, wrap tightly in plastic wrap and store at room temperature or freeze for up to 2 months.
Decorating Your Birthday Cake: Easy Techniques for a Showstopper
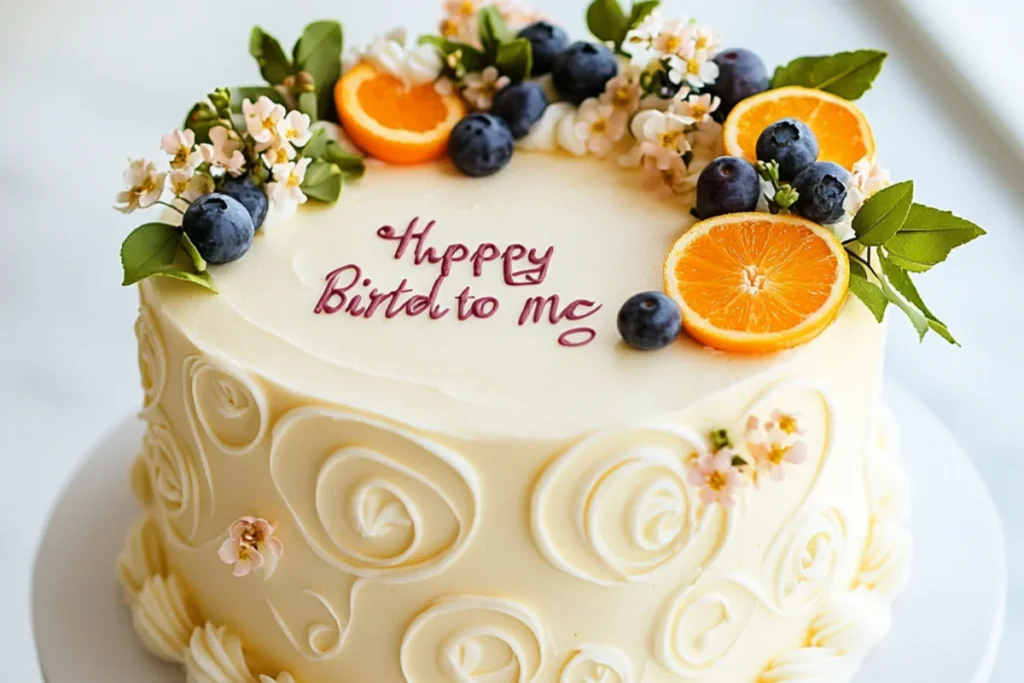
Here’s where your birthday cake becomes more than dessert — it becomes the centerpiece. You don’t need fancy tools or hours of piping practice. With a few basic techniques and a little imagination, you can create a cake that looks as amazing as it tastes.
Make the Buttercream Frosting
This classic vanilla buttercream is smooth, fluffy, and sturdy enough to hold your decorations:
- 1 cup (230g) unsalted butter, softened
- 3½ cups (420g) powdered sugar
- 2 tablespoons heavy cream or milk
- 1 tablespoon vanilla extract
- Pinch of salt
Beat butter until creamy, then gradually add powdered sugar. Add cream, vanilla, and salt, beating until light and spreadable. Adjust consistency with more cream (to soften) or sugar (to thicken).
Frost Like a Pro (Even if You’re Not One)
- Level the cake layers with a serrated knife if needed.
- Place one layer on your serving plate and spread an even layer of frosting on top.
- Add the second layer and frost the top and sides.
- For a smooth finish, dip your offset spatula in warm water and run it along the surface.
- Add decorations — sprinkles, piping, fruit, or even edible flowers.
Want to go minimal? A simple swirl pattern and a few candles can still make your birthday cake feel festive and heartfelt.
Can I Decorate the Cake the Day Before?
Yes — and it might actually taste better. A decorated birthday cake can be stored at room temperature for up to 24 hours, lightly covered. Just wait to add perishable toppings like fruit or whipped cream until just before serving.
Variations to Try: Making the Birthday Cake Uniquely Yours
Not every birthday cake has to be vanilla with buttercream — unless that’s your tradition, in which case, no judgment. The real beauty of baking from scratch is the freedom to tweak, twist, and reinvent. Here are some ways to put your own stamp on a classic celebration cake.
Popular Flavor Twists
- Chocolate Lover’s Cake: Swap ¾ cup of flour for unsweetened cocoa powder. Add ½ teaspoon of espresso powder to deepen the flavor.
- Cupcake Option: Prefer a personal-sized treat? Transform this batter into delightful birthday cupcakes—perfect for school celebrations, parties, or portion control. Just adjust the bake time to 18–22 minutes.
- Funfetti (Confetti Cake): Stir ½ cup rainbow sprinkles into the batter right before baking. Use jimmies, not nonpareils — they don’t bleed color.
- Lemon Zest Cake: Add 2 tablespoons lemon zest and 2 tablespoons lemon juice to the batter. Pairs beautifully with a tangy cream cheese frosting.
- Red Velvet Variation: Use buttermilk, cocoa powder, and red food coloring to turn your base into a bold, soft red velvet birthday cake.
Dietary-Friendly Swaps
- Gluten-Free: Use a 1:1 gluten-free baking flour blend with xanthan gum included. Check labels for cross-contamination.
- Vegan: Substitute eggs with flax eggs, butter with vegan baking sticks, and buttermilk with plant milk + vinegar.
- Dairy-Free: Use plant-based milk and a neutral oil or dairy-free margarine.
Each of these tweaks can be made without changing the core process — so you’re still getting a reliable, celebratory birthday cake, just with a personalized spin.
Can I Mix Flavors in One Cake?
Yes — you can marble chocolate and vanilla batters or layer two different flavors. Just be mindful of bake times and consistency. A well-balanced mixed-layer birthday cake is a crowd favorite.
Storage and Serving Suggestions for Your Birthday Cake
You’ve baked, frosted, and maybe even snapped a few proud photos — now it’s time to make sure your birthday cake stays just as good as when it left the oven. Proper storage and serving don’t just preserve flavor; they elevate the entire experience.
How to Store Your Cake
- Room Temperature (Short Term): A frosted birthday cake will keep well at room temp for up to 24 hours. Cover it loosely with foil, a cake dome, or an inverted bowl.
- Refrigerator (Longer Storage): If your cake has fresh fruit, cream cheese, or whipped cream frosting, refrigerate it. Wrap loosely in plastic or store in a cake container. Let it come to room temperature before serving to restore softness.
- Freezing: Unfrosted layers can be wrapped tightly in plastic and frozen for up to 2 months. Thaw in the fridge overnight before using.
Serving Tips
- Use a sharp, clean knife for clean slices.
- Warm the knife under hot water, then wipe dry between cuts.
- For even portions, cut 9-inch round cakes into 12–16 slices.
- Serve with coffee, tea, milk, or even a small scoop of ice cream for extra flair.
How Long Will This Birthday Cake Stay Fresh?
If stored properly, your birthday cake will stay moist and delicious for up to 3 days. After that, the texture may begin to dry slightly — though a quick microwave zap (10 seconds per slice) can revive it.
Frequently Asked Questions About Birthday Cakes
What size cake should I make for a party?
For a small gathering (8–10 people), a standard two-layer 9-inch birthday cake is perfect. For larger groups, consider doubling the recipe or making it in a 9×13-inch sheet pan. Just remember to adjust baking times accordingly.
Can I bake the cake layers in advance?
Yes — and it can actually make decorating easier. You can bake the layers up to two days in advance. Let them cool fully, then wrap tightly in plastic wrap and store at room temperature or freeze them for longer storage.
How do I keep the frosting from melting or sliding?
Make sure your cake is completely cooled before frosting. If your kitchen is warm, chill the layers briefly before stacking. Buttercream behaves best when kept cool and firm during assembly.
Is there a shortcut for making a birthday cake if I’m short on time?
You can absolutely use a high-quality boxed mix as a base, then elevate it with homemade frosting, mix-ins like sour cream or pudding mix, or flavor extracts. It won’t be 100% from scratch, but it’ll still be a worthy birthday cake.
How do I transport the cake safely?
Place the birthday cake on a sturdy cake board or plate, then into a box that fits snugly. Keep it level and transport it on a flat surface in your car — like the trunk or the floor — rather than a seat. Drive carefully, especially around turns.
A Birthday Cake That Means Something
There’s something timeless about baking a birthday cake. Maybe it’s the way flour and sugar come together to mark a moment, or how a single candle can turn dessert into a celebration. Whatever the reason, it’s never just about the cake — it’s about the feeling behind it.
By now, you’ve got everything you need to make that feeling real. You’ve chosen your ingredients, followed each step, maybe even tried a variation or two. And whether it’s for a first birthday or a fiftieth, the cake you bake will carry something store-bought never can — intention, effort, and heart.
So light the candles, cut the first slice, and don’t forget to sneak a bite before the plates are cleared. After all, you made this birthday cake — and that’s something worth celebrating.
Explore more delicious Dessert recipes on InnovateRecipes_ Pinterest and stay updated with the latest cooking tips by following Innovate Recipes on Facebook.